
Embedded Systems / F&S Boards
Loading OS onto the board
Before we build our own operating system, let us explore, the operating system which F&S already built for efus MX8MP board. It will help us to learn how to load an already built OS onto a board, explore its features and identify its deficiencies. With your Fedora VM booted up, perform these actions:
- Create a folder on your host PC (in this article we’ll assume the folder is “d:\work”).
- In Oracle VirtualBox Manager, right-click your VM → Settings… → Shared Folders.
- At the right side of the window, there’s a bluish icon with a green + sign for adding a new shared folder. Click it.
- Type path to your folder on your host PC into “Folder Path:” (e.g., d:\work).
- Type mount point location into “Mount point:” textbox. This is the folder in the virtualized file system, where content of the host PC’s folder will be mapped to. For example:
/mnt/work - Check “Auto-mount” checkbox. Click OK button.
- Click OK button again.
- From your Fedora VM, Open MATE terminal.
- Browse to the folder, where built OS is located.
cd /home/developer/fsimx8mp-Y2025.12/binaries - Locate file with
.sysimgextension.ll *.sysimg - Copy it to your host PC’s file system:
cp *.sysimg /mnt/work - On your host PC, run Rufus. If you don’t have it, get it here.
- Insert an SD card to your host PC.
- Run Rufus.
- Choose your SD card drive from “Device” combobox.
- Click “SELECT” button. Navigate to the folder where your “sysimg” file is. By default Rufus won’t display files with “sysimg” extension. Use combobox in the bottom right part of the open file dialog to choose “All files (*.*)”.
- Find your “.sysimg” file and click Open button.
- Leave all other settings in Rufus at their default values. The Rufus window should similar to this:
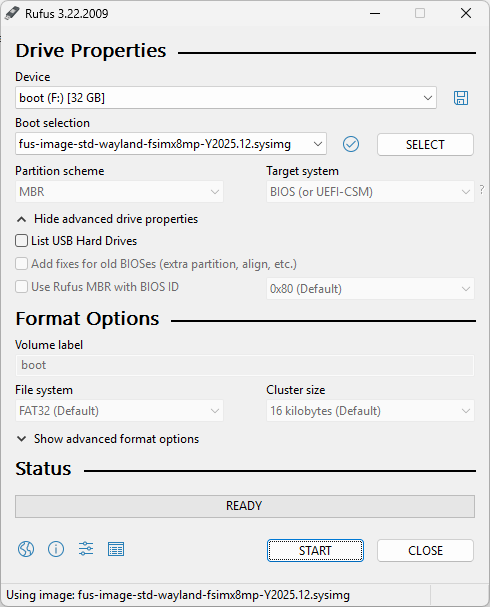
- Press START button.
- When Rufus finishes, safely remove SD card from your host PC and insert it into baseboard of your efus MX8MP board.
- SD card was prepared by Rufus in a way, that it contains 2 partitions. The first partition has FAT file system on it. The first parition contains operating system kernel file and multiple different DTB files (DTB = device tree blob), which are, simply put, files containing hardware drivers. The second partition is formatted with ext4 file system and therefore your Windows OS very likely won’t show it to you.
- Assuming you are successfuly connected to your embedded board over serial cable with PuTTY, used
rebootcommand to reboot the board. Pay attention to the boot messages. As soon as
Hit any key to stop autoboot:
message appears, hit any key on the keyboard to stop autoboot. This will cause boot process to stop in so called
U-boot. Use commandversionto print out U-Boot version number.
- Once successfuly confirmed you are in U-Boot, use this command to list all mmc devices:
mmc listExpected output:
FSL_SDHC: 0 (eMMC)
FSL_SDHC: 2The output tells which number is assigned to eMMC – the internal MMC memory of the board (likely 0) and which number is assinged to your SD Card (likely 2). - Select your SD card and verify it’s readable:
mmc dev 2 mmc rescan - List content of your SD card:
ls mmc 2Expected output: you should see a list of files on your SD Card. Entire OS kernel is in a file named Image. You should also see several files all with *.dtb extension.
- A more versatile command for listing content of your SD Card is:
fatls mmc 2:1This lists content of FAT file system from MMC device number 2 (SD Card) from its partion 1. As stated above, your SD card should have two partitions at this point. However
fatls mmc 2:2command will not work, because partition 2 has ext4 file system on it. You can list content of partion 2 too, however, you have to use this command:ext4ls mmc 2:2This will list the content of root file system.
- To verify, that your SD card is indeed paritioned according to the description above, use this command:
mmc part - Next step is to inspect current boot settings, which are stored in 3 environment variables: kernel fdt rootfs
printenv kernel fdt rootfsExpected output:
kernel=mmc rescan; load mmc 0 . Image
fdt=mmc rescan; load mmc 0 0x43100000 efusmx8mp.dtb; booti 40480000 - 0x43100000
rootfs=root=/dev/mmcblk0p2 rootwait - Update
kernelenvironment variable so that kernel is loaded fromImagefile from SD Card:setenv kernel 'mmc dev 2; mmc rescan; load mmc 2:1 0x40480000 Image' - Update
fdtenvironment variable so that device tree blob is loaded fromefusmx8mp.dtbfile from SD Card:setenv fdt 'mmc dev 2; mmc rescan; load mmc 2:1 0x43100000 efusmx8mp.dtb; booti 0x40480000 - 0x43100000'Instead of `efusmx8mp.dtb` you may use any filename of your choice from your SD card, which contains the correct device tree blob (flattened device tree, i.e., drivers) for your hardware.
- Update
rootfsenvironment variable so that root file system is loaded from partition 2 of your Card:setenv rootfs 'root=/dev/mmcblk2p2 rootwait' - Finally, before we proceed to boot, take a look at
set_bootargsenvironment variable:printenv set_bootargsset_bootargsenvironment variable is configured in such a way, that if its content was executed within shell, it would setbootargsenvironment variable. In doing so, it will also use content ofrootfsenvironment variable which have just set. A run command does just that. It executes value of an environment variable within a shell. Do that now:run set_bootargs - Finally, proceed with OS boot:
boot
Important: As we did not execute saveenv command before executing boot, the environment variables were not saved. Therefore, if you reboot the board again, it will boot to the previous (original) OS build with its original root file system and original device tree blob. Thefeore, the above description is useful for testing a certain build of an operating system, because if anything fails, you can simply reboot the board and boot back to previous (and hopefully stable) operating system. Later, we will explore how to copy the components of the operating system (kernel, device tree and root file system) to the primary MMC (the eMMC) of the board so that it loads your new OS from its internal memory and not from SD card.